Introduction
Gym wall padding installation is moderately complex : straightforward on open masonry walls, but demanding when you're cutting around fire pull stations, mounting on ceramic tile, or sequencing custom-branded pads across a 50-foot baseline. A 2002 incident in Sarcoxie, Missouri, where a 14-year-old basketball player suffered traumatic brain injury crashing into an unpadded metal wall less than four feet from the court, illustrates why correct installation matters. Even when padding is present, insufficient protection or improper mounting creates liability exposure.
Who should handle the install? Experienced maintenance staff can manage basic runs on clean masonry walls. Projects involving columns, doors, custom cutouts, or ceramic tile call for professional installers. The cost of getting it wrong is real:
- Pads sit crooked or pull away from the wall
- Gaps between panels create impact injury risk
- Fasteners fail under repeated contact
- Misaligned cutouts require 2-3 week replacement cycles
Whether you're managing the project yourself or coordinating with a crew, this guide covers all three installation methods (furring strips, Z-clips, and Tapcon screws), step-by-step execution, wall surface compatibility, and field-tested practices to avoid the most common failures.
Key Takeaways
- Three installation methods: furring strips (most permanent), Z-clips (removable, one-person), and Tapcon screws (masonry only)
- Foam compression causes pad "growth" — always perform cutouts on-site, never from factory measurements
- ASTM F2440-11 sets floor clearance maximums; limits vary by surface type (2–4.5 inches)
- Dry-lay custom-branded pads on the floor before drilling to catch logo alignment errors
- Complex installs (ceramic tile, columns, custom graphics) call for professional crews to avoid costly rework
Before You Start: Prerequisites and Safety Considerations
Confirm Wall Surface Type Before Selecting Hardware
Each wall type requires different fasteners and installation approaches:
- Concrete masonry units (CMU) — accept all three installation methods
- Drywall over studs — requires hitting studs with furring strips or toggle bolts; Tapcon screws won't work
- Ceramic tile walls (common in older school gyms) — particularly challenging; standard drill bits crack tile, concrete screws won't bite cleanly through grout lines, and pads typically need grout-line anchoring combined with construction adhesive
- Steel walls — limit options to adhesive-backed systems or Z-clips mounted to furring that bridges the metal surface
Survey walls for exposed conduit before ordering Z-clips. Z-clip systems require the pad back to sit flush against the wall; conduit prevents this. Attempting to cut the pad backing to accommodate conduit causes the pad to fall apart or wrinkle, creating a failed installation.
Measure Before Ordering — and Account for Growth
Confirm these measurements before finalizing pad orders:
- Total linear footage of wall coverage needed
- Floor clearance height (ASTM F2440-11 mandates pads be mounted no more than 4 inches above the playing surface to prevent body contact with unpadded wall)
- Location of all obstacles: outlets, fire pull stations, circuit breakers, windows, doors, chin-up bars with spring mechanisms
- Cutout requirements — but plan to execute cutouts on-site
Why on-site? Pad "growth" is a real installation risk. Even 1/10 inch oversize per pad accumulates across a 30-foot run (15 standard 2-foot pads), pushing cutouts 1.5 inches out of position. Foam compression where pads butt together shifts cutout positions further.
Experienced installers measure for cut pads at the wall edge closest to the cutout — and still often re-cut due to growth. A miscut pad requires 2-3 weeks to manufacture, so getting this right matters.
Verify Safety Certifications Before Purchase
Never install pads without confirming they meet safety requirements:
Impact protection: ASTM F2440-11 requires Gmax ≤ 200 and HIC < 1000. Premium pads substantially exceed minimums — Sportsfield Specialties ProSafe pads achieve Gmax 94 / HIC 286, roughly 53% lower Gmax than standard pads.
Fire safety: Wall pads must be tested as complete assemblies (vinyl + foam + backing together) under NFPA 286. Pads with only component-level fire ratings for vinyl or foam separately do NOT meet NFPA 101 or IBC code. New York, Rhode Island, Connecticut, and Tennessee strictly require Class-A rated pads. Exception: Class-A generally not required when mounted directly to CMU.
Children's facilities: CPSIA compliance is critical for schools and youth facilities. Lead limit is 100 ppm in accessible components; phthalate limit is 0.1% (1000 ppm) for eight specific chemicals. The Windscreen Factory's gym wall padding carries CPSIA certification with lead levels far below 100 ppm and full phthalate compliance.
The Three Methods of Gym Wall Padding Installation
Three main methods cover nearly every gym wall padding scenario: furring strips, Z-clips, and Tapcon concrete screws. The right choice depends on your wall surface material, whether the pads need to be removable, and your budget. Choosing the wrong method is one of the most common installation mistakes.
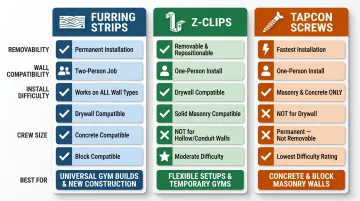
Furring Strip Method
Three horizontal rows of wood (4-6 inches wide) are mounted to the wall at top, middle, and bottom positions. Pads are then nailed at an angle through the vinyl and foam into the furring strip — a technique called toenailing.
Ideal for: Permanent installations in schools where students cannot easily pry pads off. Toenailing the first and last pad in each row adds extra tamper resistance.
Pros:
- Most secure, professional-looking finish
- Maximum resistance to vandalism
- Works on any wall type (concrete, drywall, tile) with appropriate wall anchors
Cons:
- Most labor-intensive — requires two installers
- More drilling and fasteners overall (three strips per pad height plus strips around all cutouts)
- Pads must be fully removed for any maintenance access
Fastener options for furring-to-wall attachment:
- 3/16" x 3/4" plastic anchors with #6 x 1-1/2" wood screws (drywall/masonry)
- 4d cut nails (1-1/2" length) into mortar joints (masonry)
- Power-actuated 1-1/2" x 9/64" fasteners (concrete)
Vertical spacing (center-to-center): 57.5" for 5-foot pads; 69.5" for 6-foot pads; 81.5" for 7-foot pads.
Z-Clip Method
Z-clip bars are mounted horizontally on the wall (typically 72 inches long). Matching Z-clips (20 inches long, 4 inches for corner pads) attach to the pad back. Pads slide into place and can be removed without tools.
When to use it: Multi-use facilities that remove pads periodically for maintenance access, storage, or room reconfigurations. Only one installer needed versus two for furring strips.
Pros:
- Easy removal and reinstallation
- One-person installation
- Fewer wall penetrations than furring strips
Cons:
- Students can pull pads off (less secure than furring)
- Will NOT work on walls with exposed conduit
- Requires 1.5" clearance above pad for installation/removal
Critical placement: Two clips per standard pad (one near top, one near bottom, approximately 12 inches from edges). Pads 7 feet or taller require a third clip at the middle. Factory-supplied #10 x 1/2" wood screws attach clips to the pad OSB backing (three screws per clip).
To prevent detachment if screws loosen over time, apply a dime-sized amount of construction adhesive next to each screw on Z-clip assemblies.
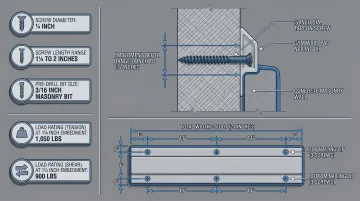
Tapcon Concrete Screw Method
Screws are driven directly through the 1-inch nailing lip at the top and bottom of each pad into the masonry wall — no intermediate hardware needed.
Compatible with masonry walls ONLY. Not suitable for drywall, stud walls, or ceramic tile.
Best for: Permanent installations on confirmed masonry where speed matters and the wall surface is solid concrete or CMU.
Pros:
- Fastest installation method
- Fewest components (just screws)
- Clean, low-profile finish
Cons:
- Higher cost per fastener than other methods
- Only works on solid masonry
- No removability for maintenance
Recommended specs: 1/4" diameter Tapcon screws, 1-1/4" to 2" length. At 1-1/4" embedment in 2000 PSI concrete, a 1/4" Tapcon provides 1,050 lbs tension (pull-out) and 900 lbs shear. Use 6 fasteners per 2-foot-wide pad (3 top, 3 bottom). Pre-drill with a 3/16" masonry bit; embedment depth should be at least 1 inch and no more than 1-3/4 inches.
How to Install Gym Wall Padding: Step-by-Step
These five steps cover the full installation sequence, from layout to final cutouts. Skipping or reversing them, especially establishing the guide line before fastening, consistently leads to misaligned pads, visible gaps, and cutouts that don't line up.
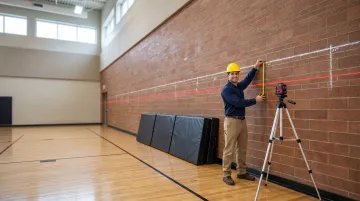
Step 1: Establish the Guide Line
Use a laser level or chalk line to mark the top edge of the pad run around the entire perimeter. Because gymnasium floors are rarely perfectly level, always level off from the desired height rather than measuring straight up from the floor.
For Z-clip installations: mark the bottom wall line 7.25 inches up from the finished floor (this places the pad bottom 4 inches above floor). Top wall line = bottom line + (pad height minus 7.75 inches).
Step 2: Locate Anchoring Points
For stud walls: Use a stud finder to mark studs just above the guide line. Each pad must be anchored into at least one stud, since drywall alone does not provide sufficient holding strength.
For masonry: Confirm the surface is solid CMU or poured concrete. Select appropriate fasteners (Tapcons for direct mount, cement screws or drive rivets for furring strips).
For furring strip installs: Mount and level all three rows of wood before touching the pads. Then apply adhesive in two locations:
- Back of each furring strip before wall attachment
- Front face of each furring strip where the pad will sit
Always use foam-safe, solvent-free adhesive formulations. Standard solvent-based products dissolve foam and will compromise the pad backing.
Step 3: Dry-Lay Custom or Branded Pads First
If pads have custom graphics, logos, or color-sequenced panels, lay them out on the floor in installation order before drilling anything. Photograph the confirmed sequence and note any factory numbering on the pad backs before moving to the wall.
Step 4: Secure Pads from a Fixed Reference Point
Start installation from a corner or the wall edge closest to any cutouts. Align the top edge to the guide line. Apply construction adhesive (quarter-sized dollops at edges and center back) to keep pads flush against the wall. Fasten with 2-3 screws per nailing margin at top and bottom. Keep pads butted tight together to avoid gaps.
Work methodically around the room, checking alignment to the guide line every 3-4 pads.
Step 5: Handle Cutouts On-Site
For small obstacles (outlets, fire pull stations):
- Install pads up to the cutout point
- Measure actual cutout location on the wall from the last installed pad
- Transfer measurements to the back of the next pad
- Cut through the 7/16" OSB backing with a circular saw
- Carefully cut through foam with a fresh box cutter (avoid excess removal)
- Score an X into the vinyl front face with the blade tip
- Push the cutout insert through from the back
- Fold the vinyl flap to the back side and staple it down
- Add furring strips around cutouts so cut edges cannot be pulled off the wall

Larger obstacles require a different approach. For columns, doors, and fire equipment: use factory-made cutouts with sewn edges. Field cuts on large openings compromise pad integrity and produce frayed edges that fail over time.
Leave clearance around fire pull stations, door handles, and chin-up bars with spring mechanisms. Verify all access points remain fully operable after pad installation.
Post-Installation Checks and Validation
Before reopening the space, run through each of these checks. A pad that looks secure at installation can shift, pull away, or expose hazards after the first real-use collision — catching issues now prevents injuries later.
- No visible gaps between panels — gaps create pinch points and signal improper fastening
- All fasteners fully seated — no screw heads protruding through vinyl, which creates puncture hazards
- Clean cutouts with smooth edges — outlets, fire stations, and door handles must remain fully accessible and operable
- Firm-pressure test at edges and corners — any pad that shifts, rotates, or pulls away from the wall needs immediate refastening
Document the completed checks with photos before reopening. If your facility undergoes inspections, this record confirms proper installation and supports any warranty claims down the line.
Common Installation Problems and Fixes
Pad Growth Causing Cutout Misalignment
After installing multiple pads, the cumulative effect of foam compression and slight size variance causes the pad run to run longer than measured — pushing cutouts out of position. Ordering dimensions rarely account for how foam expands when pads are butted together under pressure. Even 1/10 inch oversize per pad adds up fast across a long wall.
Plan cutouts on-site after installing up to the cutout point rather than marking them from initial measurements. Keep a box cutter and circular saw available for on-site adjustments, and budget for one replacement pad if the cutout position shifts more than a few inches.
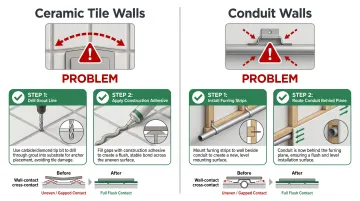
Pads Not Sitting Flush on Ceramic Tile or Conduit Walls
Pads that bow outward or sit unevenly create visible gaps and pressure points that reduce impact protection and look unprofessional. The underlying issue is that standard installation assumes flat, clean masonry or drywall — ceramic tile grout lines and exposed conduit both prevent the pad back from making full contact.
The fix depends on what you're working with:
- Ceramic tile: Anchor through grout lines using carbide-tipped or diamond-tipped drill bits to prevent tile cracking, then apply compatible construction adhesive to the pad back. The adhesive bridges grout line irregularities where mechanical fasteners can't reach.
- Conduit walls: Z-clips won't work here. Switch to the furring strip method, which bridges over conduit obstructions, or route conduit behind the furring plane before pad installation begins.
Fasteners Pulling Out or Pad Edges Lifting Over Time
When pads start pulling away from the wall at corners or edges weeks after installation, the cause is almost always the wrong fastener for the wall type — screws driven into drywall without hitting studs, or Tapcon screws used on walls that aren't solid masonry. Repeated impact forces do the rest.
Confirm wall type before selecting fasteners, then reinstall with the correct hardware:
- Toggle bolts for drywall between studs
- Furring strips anchored directly into studs
- Masonry anchors for CMU or concrete block walls
Add construction adhesive as a secondary bond regardless of fastener type. It's the cheapest insurance against future detachment.
Pro Tips for Installing Gym Wall Padding Effectively
Schedule during off-hours. An active gym creates real pressure to cut corners — rushed installs lead to measurement errors and incomplete adhesive curing. If construction adhesive is used, allow at least 24 hours before heavy facility use to ensure full bond strength.
Document the layout before installation. Photograph the wall pre-install and note locations of all outlets, fire equipment, and structural features. That record is invaluable if pads need removal or replacement later, and helps future installers match the original layout.
Know when to bring in a professional. Custom-branded layouts, large-scale multi-wall installs, ceramic tile surfaces, and configurations involving columns or fire safety equipment all carry enough complexity to justify professional help. The Windscreen Factory's installation crews handle these scenarios with on-site measurement and manufacturer warranty protection. On complex jobs, rework costs routinely exceed what professional installation would have cost from the start.
Don't strip the OSB backing. Use caution with drill torque settings when driving screws into 7/16" OSB. Stripped screw holes in the backing compromise pad integrity and require relocating fasteners or replacing the pad.
Add a middle furring strip on tall pads. For pads 7 feet or taller in furring or channel systems, install a thin (1/4" to 3/8") furring strip at the midpoint to prevent wrinkles and maintain a smooth surface.
Conclusion
Installation quality directly determines both the safety performance and longevity of gym wall padding. A correctly installed pad — flush, firmly anchored, and properly positioned — will absorb impacts reliably for 7–10 years. A poorly installed pad creates real liability exposure: gaps allow body contact with hard surfaces, loose fasteners fail under impact, and misaligned cutouts block emergency equipment access.
The documented 1997 fatality in Trotwood-Madison, Ohio, and the 2002 traumatic brain injury in Sarcoxie, Missouri, make clear what's at risk when installation is treated as an afterthought. Three phases separate a compliant install from a dangerous one:
- Preparation: Surface assessment, accurate measurement, and correct pad sequencing
- Execution: Following the guide line and selecting the right fasteners for the substrate
- Validation: Post-installation inspection to confirm flush fit, secure anchoring, and clear emergency equipment access
Done right, wall padding does exactly what it's designed to do — protect athletes for years without incident.
Frequently Asked Questions
Why are gym walls padded?
Gym wall padding protects athletes from impact injuries when they slide, fall, or crash into hard surfaces. It's especially critical near basketball baselines, under backboards, and along wrestling room perimeters where high-speed contact with concrete or masonry walls is common.
What materials are used for gym wall padding?
Standard construction includes a 7/16-inch OSB plywood backing for rigidity, a 2-inch polyurethane foam layer for impact absorption, and a 14 oz minimum polyester-laminated vinyl outer covering for durability and cleanability. Fire-retardant and CPSIA-compliant material options exist for facilities serving children.
How thick is gym wall padding?
The most common foam thickness is 2 inches for standard gym applications, meeting ASTM F2440-11 requirements. Thicker options (3 inches) are available for higher-impact sports like wrestling or martial arts, where athletes travel greater distances before contact and collision forces are higher.
What is the standard height of gym wall padding?
Standard pad dimensions are 2 feet wide by 6 feet tall, with 5-foot and 7-foot height options available. Installation places the bottom 4 inches off the floor for tile or poured surfaces, 4.5 inches for wood floors with vented base (to allow airflow), and 2-3 inches for wrestling rooms.
How much does gym wall padding installation cost?
Material costs typically run $15-25 per square foot for standard vinyl pads, $25-40 for premium impact-rated pads, $35-50 for custom graphics, and $40-60 for fire-rated specialty pads. Total project cost also depends on pad count, cutout complexity, shipping, and whether professional installation is included.
Is gym wall padding safe for kids?
Yes, when certified to CPSIA standards with lead levels below 100 ppm and phthalate compliance below 0.1%. Always verify certifications before purchasing — The Windscreen Factory's gym wall padding meets CPSIA requirements with lead levels well below the safety threshold and full phthalate compliance.