The difference comes down to three factors: correct tensioning, fastener spacing, and material handling. Get any of these wrong, and you'll see sagging panels within weeks, tearing at grommets after the first wind event, or complete detachment during a storm. Each of these failures leads to rework costs and shortened screen lifespan—problems that proper installation prevents entirely.
This guide covers the complete process for installing a windscreen correctly, from site preparation through final validation, whether you're tackling a backyard fence or coordinating a multi-court facility project.
Key Takeaways
- Residential windscreen installation is DIY-friendly; large athletic or commercial projects need experienced crews
- Preparation matters: verify fence condition, confirm measurements, and select UV-resistant, breathable material before starting
- Fasten at every grommet using UV-resistant zip ties or bungee cords, working from the top down and from corners toward the center
- Distribute tension evenly across the full run; overtightening any single fastener point accelerates wear and failure
- Walk the full installation length and inspect every grommet before calling the job complete
Installing a Windscreen: Complete Guide
Windscreen installation follows a fixed sequence: preparation, positioning, securing, and tensioning. Skipping or rushing any phase is the most common cause of premature failure. CoverSports notes that if cable ties break and the screen whips against the fence, it can be "destroyed beyond repair within a few hours."
A standard residential fence run takes a few hours with two people. Large commercial or sports facility installations involving multiple panels, post wrapping, or custom dimensions require more time, additional crew, and careful sequencing.
Prerequisites and Safety Considerations
Before installation begins, confirm three non-negotiables:
Fence structural integrity: Posts must be firmly anchored and rails free of rust or damage. Beacon Athletics warns that a windscreen turns a fence into a "sail"—improper installation can bend fence posts or collapse the structure entirely in high winds. Audit existing pole sizing, spacing, and bury depth before proceeding.
Precise measurements: Measure fence height and run length accurately. Confirm the windscreen dimensions match or can be trimmed without compromising grommet placement. Account for 4-6 inches of ground clearance at the bottom to prevent mower damage.
Material compatibility: Not all windscreens suit all environments. Confirm the screen is:
- UV-stabilized — The Windscreen Factory uses 1.5% Amplas CM111821 combined with 1.5% Equaster CM106000 UV inhibitor composition to prevent degradation from sun exposure; products also meet CPSIA certification standards with lead levels far below 100 ppm
- Breathable — allows air circulation to reduce wind pressure and prevent moisture accumulation
- Mildew-resistant — prevents fungal growth in damp conditions
Safety thresholds:
- Do not install in winds exceeding 40 mph (OSHA's high-wind threshold)
- Use ladders rated for at least four times the maximum intended load
- Do not begin installation on damaged or unstable fence structures
Tools and Materials Required
Essential tools and materials:
- UV-resistant zip ties (heavy duty, minimum 50 lb tensile strength)
- Bungee cords or ball bungees for high-wind sections
- Measuring tape
- Utility knife or heavy-duty scissors
- Work gloves and safety glasses
- Ladder for top-rail access
- Second person (strongly recommended for panels over 10 feet)
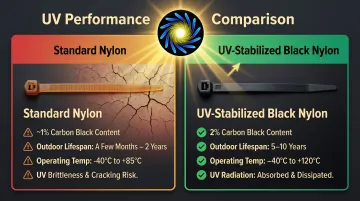
Why UV-resistant fasteners matter:
Standard nylon cable ties degrade rapidly outdoors, lasting only a few months to two years. UV-stabilized black nylon ties with 2% carbon black content last 5-10 years. The carbon black absorbs and dissipates UV radiation, preventing the brittleness and cracking that leads to fastener failure.
| Fastener Type | Carbon Black Content | Outdoor Lifespan | Operating Temperature |
|---|---|---|---|
| Standard Nylon | ~1% | A few months to 2 years | -40°C to +85°C |
| UV-Stabilized Black Nylon | 2% | 5 to 10 years | -40°C to +120°C |
Fastener specifications:
- CoverSports recommends 8-inch, 50 lb tensile strength zip ties—one separate tie per grommet
- For rollable screens or high-wind areas, use 120 lb breaking strength ties or snap hooks on top and bottom edges
- Ball bungee cords offer load ratings of 100 lbs (1/8-inch diameter) to 400-500 lbs (1/2-inch diameter) and provide controlled flex in wind
Optional but advisable:
- Grommet reinforcement kit for cut edges
- Electric zip tie gun for long runs
- S-hooks to temporarily hang the screen during installation
Standard household zip ties, staples, or wire are a leading cause of grommet tearing and panel loss — always use exterior-rated, UV-resistant fasteners.
How to Install a Windscreen: Step-by-Step
Installation shortcuts—starting in the middle, using insufficient fastener counts, or skipping tensioning checks—create problems that won't appear until the first strong wind event.
Step 1 — Prepare the installation site
Clear debris from the fence line and inspect every post and rail for structural integrity. Measure and mark the intended start and end points. Lay the windscreen panel flat on a clean surface to check for defects before mounting.
Step 2 — Position and secure the top edge
Align the screen's top grommet row with the top rail. Fasten each grommet using zip ties, starting at one corner and working toward the opposite end in 10-foot sections, pulling taut at each grommet. Ensure the top edge sits evenly without bunching — this establishes the baseline for all remaining tension.
Tip: The "picket counting" method helps maintain level installation. Count the number of chain-link diamonds down from the top rail and hold that same diamond for every fastener along the run.
Step 3 — Secure the bottom and vertical edges
Once the top is set, pull the screen taut downward and fasten the bottom row of grommets to the bottom rail. Standard grommet spacing is 18 inches, with fasteners placed at 12-18 inch intervals along all edges. For non-grommeted mesh, place fasteners every 12 inches.
Secure the side edges to fence posts, keeping tension consistent without overloading any single grommet point. Start in the middle of the bottom edge and work toward the ends to push wrinkles outward.
Step 4 — Attach intermediate fastener points
Working from top to bottom and left to right, secure all remaining grommet points along the mesh fabric and any intermediate rails. Critical: For windscreens higher than 6 feet, lacing must be added at intervals of 6 feet or less to prevent billowing—failure to do this voids most manufacturer warranties.

For high-wind locations, use bungee ball ties instead of rigid zip ties on the main field of the screen to allow controlled flex.
Step 5 — Tension check and adjustment
Walk the full length of the installed screen and visually check that tension is even. Look for:
- Grommets under excess stress
- Sections that sag or balloon outward
- Misaligned fasteners
Adjust spacing or retension as needed before finalizing. Do not over-tighten initially—leave small extra room for final adjustments.
Step 6 — Final trim and clean-up
If any edge extends past the fence boundary, trim cleanly with a utility knife. Remove packaging material and excess zip tie tails. Avoid leaving sharp edges exposed near high-traffic areas.
Post-Installation Checks and Validation
Walk the entire installation length and check for:
- Uneven tension between fastener points
- Visible sagging or sections not sitting flush against the fence
- Grommets showing early signs of tearing
To test, expose the screen to ambient wind or simulate light pressure with your hands. Correct installation produces controlled, even flex with no isolated stress points. Localized billowing, pulling at single grommets, or visible bunching signals a tension problem that needs correction before the screen faces real weather.
Small alignment issues invisible at rest become failure points under wind loading. TennisSuppliesAndEquipment.com notes that zip ties act as "mechanical fuses" — snapping in extreme winds so the screen falls away rather than collapsing the fence. That failsafe only works when installation tension is set correctly from the start.
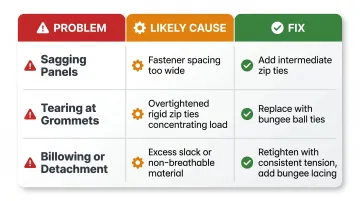
Common Windscreen Installation Problems and Fixes
Sagging Panels Between Fastener Points
Problem: The screen hangs loosely in middle sections, creating a hammock-like droop between grommets.
Likely cause: Fastener spacing is too wide—typically more than 18-24 inches between zip tie points—allowing the screen's weight and wind pressure to create unsupported spans.
Fix: Add intermediate zip ties between existing fastener points along sagging sections. For screens without mid-panel grommets, use the existing mesh weave to add support ties at closer intervals.
Tearing or Pulling at Grommet Points
Problem: Grommets are stretching, pulling through, or showing visible damage at fastener locations.
Likely cause: Rigid zip ties have been overtightened at individual grommet points, concentrating load rather than distributing it. CoverSports identifies "doubling up" grommets (using one tie for two panels) and failure to replace broken ties as primary causes of grommet damage. The problem is often worsened by undersized or UV-degraded ties that have become brittle.
Fix: Replace overtightened zip ties with bungee ball ties at affected grommet points to introduce controlled flex. Inspect adjacent grommets for early-stage stress and address before failure occurs.
Windscreen Billowing or Detaching in Wind
Problem: The screen inflates like a sail in moderate-to-strong winds, pulling fasteners loose or lifting off the fence entirely.
Likely cause: The screen was installed with too much slack, or the fence structure lacks sufficient bracing for the wind load. Beacon Athletics research shows that unless visual blockage drops below 50%, wind load remains at nearly 100%—standard vents have only a marginal effect. Solid, non-breathable screen material compounds the problem on wind-exposed sites where breathable mesh is needed.
Fix: Retighten the entire installation with consistent tension. If wind load is a known issue, add bungee cord lacing along top and bottom rails. If the material is non-breathable and the site is wind-exposed, replacing it with a breathable windscreen is the right long-term fix.
Pro Tips for Installing a Windscreen Effectively
Installation Timing and Conditions
Always install on a calm, dry day. Wind makes positioning and tensioning difficult and masks tension errors that will only appear under load. Avoid installing in extreme heat—the material will be more pliable and may appear correctly tensioned when it will actually sag once it cools.
Fastener and Material Handling
- Use only UV-resistant, exterior-rated black zip ties—clear or standard ties degrade in sunlight within months
- Trim zip tie tails flush to avoid sharp edges
- For high-wind or long-run commercial installations, supplement zip ties with bungee ball ties or lace cord through the grommet row
For Large-Scale or Commercial Installations
Athletic complexes, sports facilities, multi-court complexes, and event venues involve linear footage, corner wrapping, and structural load considerations beyond standard residential installation.
The Windscreen Factory's in-house installation crew handles projects of this scale regularly, serving schools, parks & recreation departments, and sports complexes across the United States. Our professional installation service eliminates the risk of improper tensioning, premature failure, and costly rework.
Documentation Best Practice
Photograph the installation before and after, particularly at grommet and fastener points. This protects against warranty disputes, helps identify patterns in any post-installation failures, and is a standard requirement on contracted commercial installation work.
Conclusion
Windscreen installation quality directly determines how long the screen performs. Tensioning, fastener spacing, and material selection are baseline requirements — not finishing touches. Get these wrong and even a quality screen will fail prematurely.
Take preparation seriously, follow the installation sequence without shortcuts, and complete post-installation validation before considering the job finished. For installations involving large fence runs, high-wind exposures, or complex configurations, professional installation is worth the investment. The Windscreen Factory's installation crew handles projects like these across schools, parks, and athletic facilities nationwide — reach them at 888.619.2228 or sales@thewindscreenfactory.com.
Frequently Asked Questions
How much does it cost to install a windscreen?
Basic windscreens start at $1.08 per sq ft, while specialized athletic screens run $5.40–$10.56 per linear foot. Final cost depends on linear footage, material grade, and whether you're doing it yourself or hiring a crew. Professional installation for commercial and sports facility projects is quoted separately based on project scope.
Can I install a fence windscreen myself?
Yes — standard residential installations are manageable for two people with the right tools. Work in 10-foot sections, use UV-resistant fasteners at every grommet, and check your tension before finishing. Larger or commercial projects are better suited for a professional installation team.
How many zip ties do I need to install a windscreen?
The standard guideline is one fastener per grommet, with grommets typically spaced every 12-18 inches along all edges. For a 9-foot tall, 120-foot long windscreen with 18-inch grommet spacing, expect to use approximately 100-120 zip ties. Always buy 20-30% extra to account for re-tensioning and replacements.
How long does a windscreen last after installation?
The Windscreen Factory's Poly Pro Wind Release screens last 8-10 years with proper installation; their 10oz VCP (Vinyl-Coated-Polyester) screens last 5-8 years. CoverSports warranty coverage runs 3-5 years depending on material — and is void if installation guidelines aren't followed.
What is the best way to attach a windscreen to a chain-link fence?
Threading UV-resistant zip ties or bungee ball ties through each grommet and around the chain-link wire is the standard method. Place fasteners at every grommet point along all four edges. For screens 9 feet or taller, lace the center reinforcement lip to the middle rail to prevent billowing.
Do I need to remove my windscreen during winter or in high winds?
Breathable mesh windscreens are designed for year-round use, but manufacturers recommend removal or rolling in regions with freezing temperatures or heavy snow. The Windscreen Factory's screens are breathable and mildew-resistant, though removal is advisable during extreme ice loading or sustained high-wind events.