The stakes are high when corners are cut. Common failures include turf edges that lift and peel, water pooling beneath the surface, seams that split under stress, and wrinkles that set permanently once adhesive cures. These problems are expensive and time-consuming to fix, often requiring complete removal and reinstallation.
This guide covers the complete, correct process for a glue-down concrete turf installation — from surface assessment through final validation. Whether you're outfitting a backyard batting cage, a school play area, or a commercial sports facility, you'll learn the essential steps, tools, materials, and techniques that separate successful installations from costly failures.
Key Takeaways
- Concrete is a viable base — drainage and adhesion are the two factors that make or break the installation
- Clean the surface, repair cracks, and assess drainage before laying a single piece of turf
- A 1/8-inch notched trowel, outdoor-rated polyurethane adhesive, and water roller are essential tools
- Plan all seam placement before installation starts — adjusting mid-process causes alignment problems
- Large commercial installations should be left to professional installers
Before You Begin: Surface Prep and Prerequisites
Concrete must be structurally sound, clean, and level before installation begins — uneven, cracked, or contaminated surfaces will cause adhesive failure and visible imperfections in the finished turf.
Concrete Surface Preparation Requirements:
- Sweep and pressure wash to remove all dirt, grease, oil, and gum
- Allow full drying time — moisture blocks adhesive penetration
- Fill cracks and low spots with a concrete patching compound
- Allow patching compound to cure completely per manufacturer instructions
- Test surface porosity: a 1/4-inch water drop should absorb within 1 minute
Crack Width Standards
No turf-specific manufacturer publishes a maximum crack width for concrete under artificial turf. The closest governing standard comes from general flooring adhesive guidance: surfaces must be flat to within 3/16 inch in 10 feet, and cracks exceeding 0.01 inch must be repaired.
Fill all cracks, joints, and depressions with a polymer-modified cementitious patching compound. Do not fill expansion joints with adhesive — these need to remain functional. Once the surface is structurally solid, drainage becomes the next critical consideration.
Drainage: The Most Critical Difference
Concrete is non-porous, so water cannot drain naturally through the slab as it would through soil. Without proper drainage planning, water pools beneath the turf, creating conditions for mold, odor, and structural failure.
Two approaches address this:
- Drill drainage holes through the slab at regular intervals — typically 2 to 8 inches on center. More holes mean better drainage performance.
- Select turf with high-flow permeable backing rated for hard surface applications. Standard hole-punched backing provides 30+ inches per hour; premium flow-through backing can exceed 2,000 inches per hour.
The Synthetic Turf Council standard requires turf products to drain at least 10 inches of water per hour. Verify your selected product meets or exceeds this baseline.
Underlayment and Padding Decisions
Turf can be installed directly onto concrete in most applications. However, a foam or rubber shock pad is appropriate for:
- Children's play areas (enhanced fall protection)
- Pet runs (added cushioning and comfort)
- Sports applications (impact absorption for training)
Important: Underlayment affects adhesive compatibility. Check manufacturer specifications to ensure your chosen adhesive bonds properly to both the concrete and the underlayment material.
Disqualifying Conditions
Do not proceed with installation if:
- MVER exceeds 5 lbs per 1,000 sq ft per 24 hours — test using ASTM F1869
- Slab RH exceeds 75% — test using ASTM F2170 in-situ probes
- Oil contamination cannot be fully removed — grind the surface mechanically to eliminate all residue
- Active moisture is seeping up from below — indicates hydrostatic pressure requiring professional mitigation
- The surface is dusty, friable, or crumbling — structural failure that requires repair or full replacement before proceeding
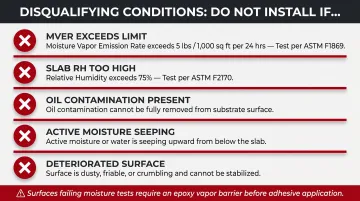
Surfaces failing moisture tests need an epoxy-based vapor barrier or retarder applied before any adhesive — skipping this step is the leading cause of turf adhesive bond failure on concrete.
Prerequisites and Safety Considerations
Personal Safety Requirements
Polyurethane adhesives used for turf installation pose genuine health hazards. GHS classifications include respiratory sensitization, suspected carcinogenicity, and skin/eye irritation.
Required PPE:
- Knee pads for extended kneeling on concrete
- Solvent-resistant gloves when handling adhesive
- Safety glasses to protect from splashes
- Respiratory protection for indoor installs (N95 minimum; organic vapor cartridge preferred)
Ventilation: Indoor installations require forced ventilation. Polyurethane adhesives release methylene bisphenyl isocyanate (MDI), which OSHA caps at a ceiling of 0.02 ppm. Adhesive fumes in enclosed spaces are a serious health hazard.
Timing Non-Negotiables
Weather Restrictions:
- Do not install in rain or when rain is forecast within the adhesive cure window
- Ideal ambient temperature: 50°F to 86°F for most adhesives
- Avoid installation when concrete surface temperature exceeds 100°F — hot concrete reduces adhesive penetration and bond strength
- High humidity shortens adhesive open time; plan smaller working sections accordingly
Temperature Windows:
On hot days, concrete surface temperatures can spike well above ambient air temperature. Install during cooler morning hours and check the slab with an infrared thermometer before you start — not just the weather app.
Tools and Materials Checklist
Before you start, gather everything below. Having the right tools on hand — especially the correct trowel size — will save you from mid-project delays.
Essential Tools
- Tape measure
- Chalk line and chalk (use colored chalk for visibility)
- Utility knife and spare blades (change blades frequently for clean cuts)
- 1/8-inch notched trowel (not a flat scraper or improvised substitute)
- Water-filled roller (100-150 lb recommended for flooring applications)
- Power broom or stiff-bristle brush
- Heavy weights: 50-pound sandbags or infill bags for compression
Essential Materials
Polyurethane Turf Adhesive:
Coverage rates vary significantly by backing type and trowel size:
| Trowel Size | Coverage Rate | Application |
|---|---|---|
| 1/8" x 1/8" square notch | 80 sq ft/gal | Rough-backed turf / all exterior |
| 3/16" V-notch | 25 sq ft/gal | Urethane stitched-backed turf |
| 1/16" x 1/16" square notch | 95 sq ft/gal | Smooth-backed turf (interior only) |
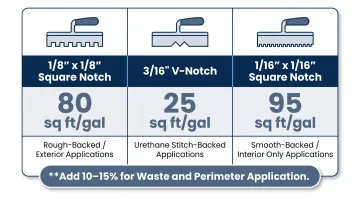
Calculate adhesive quantity based on total square footage and your specific trowel/backing combination. Add 10-15% for waste and perimeter application.
Other Materials:
- Seam tape (6-inch or 12-inch width) — optional for single-piece installs; essential for multi-section jobs
- Infill material (silica sand or crumb rubber) — recommended even on concrete to keep blades standing upright and add underfoot cushioning
- Optional: shock pad underlayment for added cushioning
How to Install Artificial Turf on Concrete: Step-by-Step
Installation on concrete follows a strict sequence. Applying adhesive before confirming layout creates problems that are expensive and time-consuming to reverse — get each step right before moving to the next.
Step 1: Plan Your Layout Before Turf Arrives
- Measure the area precisely and create a scaled drawing showing turf section placement and seam locations
- Snap colored chalk lines on the concrete to mark seam centers and exterior edges
- These lines serve as reference guides throughout the entire install and prevent misalignment once adhesive is live
- Plan seam locations to minimize visible lines and avoid high-traffic areas when possible
Step 2: Roll Out, Position, and Cut Turf Sections
- Unroll turf sections and allow them to acclimate and relax flat for 1-2 hours in ambient temperature before cutting
- Ensure all pile (blade direction) faces the same direction across sections for uniform appearance
- Cut to fit using a sharp utility knife on the backing side, leaving a small overlap at edges to be trimmed after positioning
- Change blades frequently; dull blades create ragged edges that compromise seam quality
Step 3: Connect Seams Before Any Adhesive Is Applied
- Remove scrim (loose backing threads) from the turf edge along the seam line
- Butt the two sections together along the chalk seam line with zero gap — visible gaps ruin seam appearance
- Lay seam tape beneath the joint, centered under the seam line
- Weight both sections with 50-pound infill bags spaced approximately two feet from the seam along its full length to prevent shifting
- Confirm the seam connection is clean and tight before proceeding. Seam quality cannot be corrected once adhesive is applied.
Step 4: Apply Adhesive and Lay Turf in Manageable Sections
- Fold both turf sections back approximately two feet from the seam to expose the concrete
- Using a 1/8-inch notched trowel, spread adhesive evenly across the exposed concrete
- Do not apply adhesive too thick — excess adhesive will bleed through seams and block drainage holes
- Work in 4-foot sections the full width of the turf to stay within adhesive open time
- Adhesive open time ranges 30-45 minutes depending on product and humidity — lay turf back into position before adhesive skins over
- Repeat for remaining sections, working outward from the seam line
Critical: Higher humidity shortens open time. In humid conditions, reduce each working section to 2-3 feet to stay within open time.
Step 5: Apply Compression Force Across All Glued Areas
Synthetic turf backing is not flat. Gauge rows are elevated, so adhesive must reach the full backing surface, not just the raised ridges. Compression is the only way to achieve full contact.
Compression Protocol:
- Use a water roller slowly and firmly across every glued section immediately after laying
- Roll in multiple directions to ensure complete contact
- Place 50-pound sandbags on seams for 30-45 minutes while adhesive cures
- Re-roll 30-60 minutes after the initial pass to ensure no lifting has occurred
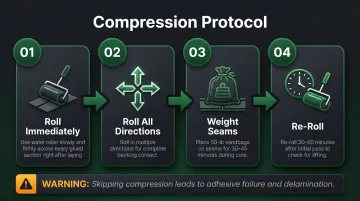
Skipping or rushing compression leads directly to adhesive failure and delamination — it is not an optional step.
Step 6: Secure the Perimeter and Add Infill
Exterior edges are the first area to fail in any glue-down installation. Give them special attention:
- Apply adhesive generously to the perimeter
- Press turf firmly into the adhesive bed
- Weight edges with sandbags or heavy objects until fully cured
- Trim any excess turf flush with the concrete boundary using a sharp utility knife
Infill Application:
Once adhesive has fully cured:
- Spread infill evenly across the surface using a power broom
- Work infill into the base of the grass fibers to support blade uprightness and provide cushioning
- Typical infill depth: 1/2 to 3/4 of blade height, depending on turf product specifications
Post-Installation Checks and Validation
Run three checks once the adhesive has cured: seam integrity, surface flatness, and drainage performance. Catching problems at this stage is far easier than fixing them after the area is in regular use.
Seam and Edge Pull-Check
Once adhesive has fully cured (typically 8-24 hours for light foot traffic, 24-48 hours for full cure):
- Grip the turf firmly at seams and edges
- Apply controlled upward force
- Any section that lifts or separates has inadequate adhesion — repair it before the area is used
Surface Inspection
With seams confirmed, scan the full surface for wrinkles, bubbles, or raised sections:
- Minor bubbles caught early can often be injected with adhesive using a cartridge applicator and re-weighted
- Wrinkles that cure in place are very difficult to remove without cutting and re-laying the affected area
Drainage Performance Test
Once the surface looks right, confirm the drainage is working before calling the installation complete:
- Pour water in multiple locations and confirm it drains through the backing and exits via drilled holes or permeable channels
- Water should clear at the industry baseline of 10 inches per hour — premium products should exceed this
- Standing water beneath the turf on concrete creates conditions for mold and odor — don't skip this test
Common Installation Problems and Fixes
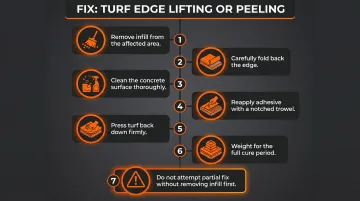
Turf Edges Lifting or Peeling at the Perimeter
Problem: Edges and corners begin to lift days or weeks after installation.
Likely Cause:
- Insufficient adhesive at perimeter
- No compression applied at edges
- Concrete surface was not fully clean and dry when adhesive was laid
Fix:
- Remove infill from the affected area
- Carefully fold back the edge
- Clean the concrete surface thoroughly
- Reapply adhesive with a notched trowel
- Press turf back down firmly
- Weight for the full cure period
- Do not attempt a partial fix without removing infill first
Wrinkles and Bubbles in the Turf Surface
Problem: Visible wrinkles or raised bubble areas appear after the adhesive has cured.
Likely Cause:
- Turf was not acclimated before installation
- Adhesive was applied too thick, causing outgassing
- Water roller was not used across the full surface
Fix:
For bubbles:
- Remove infill from the affected area
- Cut a small slit through the backing at the bubble's center
- Inject adhesive via cartridge and re-compress with sandbags
For wrinkles, the repair is more involved. Carefully separate the section, scrape the adhesive off the concrete, and re-lay the turf correctly from scratch.
Water Pooling on or Under the Turf Surface
Problem: Water sits on the surface or is visibly trapped between the turf and concrete after rain or irrigation.
Likely Cause:
- Drainage holes were not drilled in the concrete slab
- The turf selected does not have permeable backing adequate for hard surface use
- Adhesive was applied too heavily and blocked drainage perforations in the turf backing
Fix:
- If drainage holes were skipped before installation, full removal and re-installation is usually the only reliable fix
- As a partial workaround, drainage mat underlayment products can sometimes be added along edges to redirect water — search for "sports turf drainage mat" to find compatible options
- This problem is far easier to prevent than repair, so confirm your concrete has adequate slope (at least 1–2% grade) before laying any adhesive
Pro Tips for a Long-Lasting Turf Installation on Concrete
Time Your Install Strategically:
For outdoor concrete, install during cooler morning hours when surface temperature is lower. Hot concrete reduces adhesive penetration and accelerates curing time, leaving less working time per section.
Stage All Materials Before Beginning:
Plan the full install sequence and have all materials staged before applying any adhesive. Stopping mid-install to source materials causes adhesive to over-cure, resulting in delamination.
Consider Professional Installation for Large Projects:
For sports complexes, school facilities, or large commercial applications, the scale and precision required exceeds what most DIY teams can deliver. The Windscreen Factory's installation team handles athletic facility turf projects, covering correct adhesion, drainage, and compliance across large surface areas. Reach them at 888.619.2228 or sales@thewindscreenfactory.com.
Document the Installation:
Keep a photo record at each stage: concrete prep, seam placements, adhesive coverage, and the finished surface. If your turf carries a manufacturer warranty, manufacturers often require proof of correct installation — surface prep, approved adhesive, and proper tools — to honor a warranty claim.
Frequently Asked Questions
Can you install artificial turf over concrete?
Yes, concrete is a suitable base for artificial turf when properly prepared. Drainage must be addressed either by drilling holes in the slab or selecting turf with a highly permeable backing, as concrete does not drain naturally.
What should you put down before laying artificial turf on concrete?
For most applications, properly cleaned and prepped concrete can receive adhesive and turf directly. For added cushioning in play areas, pet runs, or sports applications, a foam or rubber shock pad is laid between the concrete and turf.
Do you need to drill drainage holes in concrete before installing artificial turf?
Drilling is strongly recommended for outdoor installs to prevent water pooling. Holes are typically drilled 2 to 8 inches on center in a grid pattern. An alternative is using turf with advanced permeable backing rated for hard surfaces.
How long does turf adhesive take to cure on concrete?
Cure time varies by adhesive product and temperature. Light foot traffic is typically safe after 8-12 hours, with full bond strength achieved in 24-48 hours. Higher humidity accelerates cure; lower humidity slows it.
How do you prevent artificial turf from lifting on concrete?
Three steps are especially critical at edges and seams:
- Clean the concrete thoroughly before applying any adhesive
- Use the correct notched trowel technique for even adhesive coverage
- Apply compression force immediately after laying (water roller plus weighted bags)
Can artificial turf be removed from concrete after it has been glued down?
Removal is possible but labor-intensive. Adhesive residue removal from concrete requires significant time and effort and may require chemical solvents or mechanical grinding.