Introduction
A fence that leans, sags, or falls within two years isn't just an eyesore — it's a complete rebuild. Permanent fencing installation demands precise post placement, correct concrete setting, and material decisions that directly affect structural integrity and lifespan, with almost no margin for error once footings are poured.
Who handles these projects? Skilled DIYers can tackle straightforward residential runs on level ground, but commercial installations, athletic facility perimeters, or large-acreage projects typically require professional crews with specialized equipment. The difference comes down to scale, complexity, and access to tools like powered augers and concrete mixers.
Common failures include leaning posts from insufficient depth, panels that sag under wind load, and costly boundary disputes from incorrect placement. These aren't cosmetic problems — each one typically demands full rework.
The financial stakes are real. According to NMI Fence, a 6-foot privacy fence that collapsed 14 months after installation in Tampa required tearing out 187 linear feet and cost $11,400 to rebuild. This guide covers how to avoid those outcomes, from post depth and footing specs to material selection and professional installation decisions.
Key Takeaways
- Site surveying, utility marking via 811, and permit verification must happen before any digging starts
- Post depth and concrete footing size determine long-term stability — no other variable comes close
- Your material choice drives post spacing, footing depth, and how much upkeep to expect over time
- Follow this order: layout and marking, post setting, rail or wire attachment, panel installation, gate hanging, then final validation
- Skipping alignment and plumb checks during installation means problems won't show up until the first major storm
Permanent Fencing Installation Guide
Permanent fence installation covers three distinct phases: site preparation and legal clearance, post setting (the most labor-intensive stage), and finishing work including panel attachment, gate installation, and validation checks.
Timeline expectations: A professional crew typically completes 150-200 linear feet of residential fencing in one to two days once materials arrive. Commercial or athletic facility projects scale to several days or a full week depending on terrain, material, and fence height.
Prerequisites and Safety Considerations
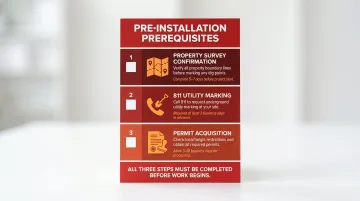
Three prerequisites are non-negotiable:
- Property survey confirmation: Use existing plat documents or commission a new survey to verify exact boundary lines before marking post locations
- 811 utility marking: Contact the national "Call Before You Dig" service at least three business days in advance (requirements vary by state: Michigan requires three days, Washington requires two, New York requires 2-10 days). In 2024 alone, nearly 197,000 underground utility damages were reported, costing approximately $30 billion annually
- Permit acquisition: Most municipalities require permits for permanent fencing and impose height restrictions (typically 6 feet for backyards, 3-4 feet for front yards). Commercial and athletic facility fencing almost always triggers permit and engineering review requirements
Site readiness checks:
- Terrain assessment: Significant grade changes require stepped or racked panel approaches, which affect post placement and height calculations
- Soil evaluation: Rocky or clay-heavy soil demands different post-setting methods than loam. Clay and silt soils are particularly susceptible to frost heave
- Obstruction identification: Note existing structures, tree roots, and drainage paths along the fence line
Critical rule: Do not begin installation if utility lines remain unmarked, property lines are unconfirmed, or permits are pending. Proceeding without clearance creates legal liability and can force complete removal at your expense.
Tools and Materials Required
Essential tools:
- Post-hole digger or auger (manual or powered)
- 48-inch minimum level
- Measuring tape and string line with stakes
- Concrete mixing equipment or pre-mix bags
- Tamping bar
- Circular saw or angle grinder for trimming
- Drill and driver
- Safety gear: gloves, eye protection, steel-toed boots
Materials based on fence type:
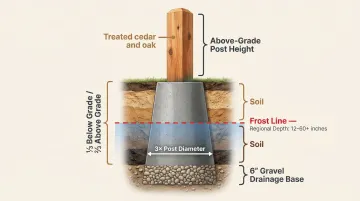
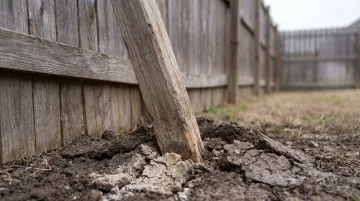
Post dimensions follow the one-third rule: one-third of total post length should be set below grade. Sakrete's technical data sheet confirms this standard. For a 6-foot fence using an 8-foot post, 32 inches goes below grade, plus 6 inches of gravel base.
Post-setting concrete:
- Fast-set concrete achieves initial set in ~30 minutes
- Minimum placement temperature: 40°F for air, mix, and substrate per ACI 306R-16
- Minimum compressive strength: 2,500 psi (per ASTM F567 for chain-link)
- Place 4-6 inches of compacted gravel at the hole bottom for drainage
Fence-specific components:
- Chain-link: Tension wire, stretcher bars, come-along, fabric ties
- Wood: Rails, pickets, brackets
- Vinyl: Pre-fabricated panels with manufacturer-specified clips
- Welded wire: Panels and mounting hardware
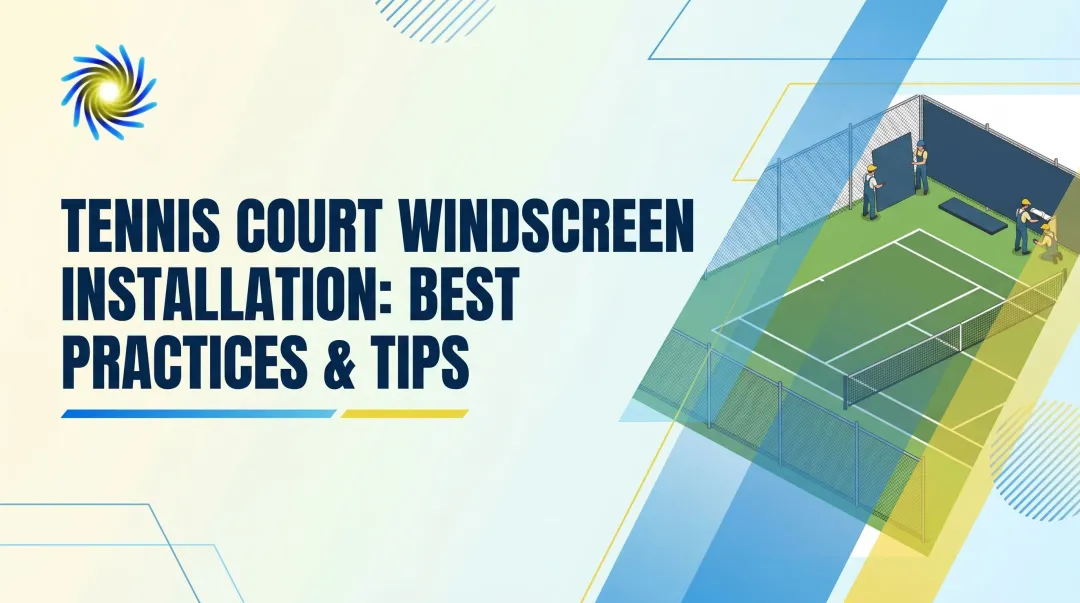
For athletic facilities: Plan windscreen attachment hardware and reinforced top rails during the layout phase. The Windscreen Factory supplies custom windscreens with reinforced borders and grommets built specifically for permanent fence attachment at sports complexes and school facilities.
How to Install Permanent Fencing: Step-by-Step
Permanent fencing follows a strict sequence. Shortcuts in post setting create structural problems that compound over years.
Step 1 : Layout and marking
- Run a string line between corner stakes following confirmed property lines
- Mark each post location at appropriate intervals:
- Chain-link: 10 feet residential, 8 feet commercial (per ASTM F567)
- Wood privacy/picket: 8 feet standard, 6 feet in high-wind areas
- Vinyl: Panel-dependent, typically 72-97 inches on center
- Ornamental iron/aluminum: 6-8 feet
- Double-check diagonal measurements on rectangular runs to confirm square corners before digging
Step 2 : Digging post holes and setting posts
- Dig holes to correct depth: at least one-third of total post length, plus 6 inches for gravel
- Hole diameter: 3-4 times post diameter per ASTM F567 (4x for posts up to 4" OD, 3x for larger posts)
- In cold climates, posts must extend below the local frost line — depths range from 12 inches (southern states) to 48-60+ inches (northern states). Apex Pergola's frost depth database provides state-by-state guidance
- Add 4-6 inches compacted gravel at the base for drainage
- Set corner and end posts first, plumb them on all four sides, then brace them
- Pour concrete around each post, crowning the pour slightly above grade to shed water
- Allow full cure: fast-set concrete achieves initial set in ~30 minutes but requires 24 hours before heavy loading
Once corner posts have cured, line posts can be set with precision.
Step 3: Setting line posts and establishing height
- After corner posts cure, run a string line between them at the intended top-of-post height
- Set each line post along this string, maintaining consistent depth and alignment
- A post even slightly out of plumb compounds visibly across a panel run, so take extra time here
Step 4 : Attaching rails, panels, or wire
- Wood fences: Attach horizontal rails to posts first, then fasten pickets using consistent spacing (use a story board or spacer block)
- Chain-link: Stretch mesh between terminal posts using a come-along and stretcher bar before securing to line posts with ties. ASTM F567 requires sufficient tension to remove all slack
- Welded wire/vinyl panels: Follow manufacturer clip or bracket specs exactly — overtightening vinyl can cause cracking
- Vinyl temperature caution: PVC becomes brittle below 40°F and can crack during installation. Bring components into heated storage 24-48 hours before cold-weather work
Step 5 : Gate installation
- Set gate posts with larger-diameter footings than line posts (gates bear dynamic load from swinging weight)
- Per ASTM F567, a residential gate post for a 4-foot-wide leaf requires 30 inches of depth versus 24 inches for a standard line post
- Hang gate hardware with correct hinge placement for gate weight — use hardware rated for at least 1.5x the gate weight to account for dynamic loading
- Verify the gate swings freely, latches securely, and doesn't drag across its full range
Post-Installation Checks and Validation
Structural checks:
- Walk the entire fence line checking each post for plumb (side-to-side and front-to-back)
- Inspect panel and picket alignment for consistent gaps and level top rail
- Check all fasteners for secure attachment
- Verify concrete footings show no visible cracking or soil subsidence around post bases
Functional testing:
- Operate every gate through its full range of motion
- Test latches under pressure
- Confirm tension wire or mesh is taut with no visible sag
- Verify fence height meets permit specifications at multiple points (ground slope can cause unintended variation)
Why validation matters: Installation defects like an out-of-plumb post or undertensioned mesh are easier to correct before backfill compacts and before adjacent panels attach. Post-completion repairs often require partial demolition.
Common Installation Problems and Fixes
Leaning or Heaving Posts
Posts that lean inward, outward, or shift upward are almost always a frost heave problem — most visible after the first one or two freeze-thaw cycles.
When posts don't reach below the local frost line, the ground's freeze-thaw cycle pushes footings upward. NMI Fence notes that "frost heave will push your posts out of the ground over 2 to 3 winter cycles" without adequate depth. Other common causes include:
- Holes dug too shallow for the soil conditions
- Undersized concrete footings that can't anchor the post
- No gravel drainage base to manage groundwater
Fix: Excavate around the affected post, remove the footing, and relay it at the correct depth with a gravel drainage base and a footing diameter at least 3× the post diameter. In freeze-prone climates, posts must reach below the local frost line — no exceptions.
Sagging Panels or Loose Mesh
Fence panels that visibly sag between posts, or chain-link mesh that develops slack waves within months, point to a span or tension problem.
Posts spaced too far apart for the panel weight or wire gauge are the most common culprit. Insufficient tension during chain-link stretching and undersized line posts for the span are close behind.
Fix: Add intermediate posts to reduce the span where sagging is structural. For chain-link, re-tension the mesh using a come-along from the terminal post. If the mesh is permanently deformed, replace the affected section rather than re-tensioning.
Misaligned or Dragging Gates
A gate that drags on the ground, fails to latch, or swings open on its own is usually a post problem — not a hardware problem.
Gate posts carry significantly more load and leverage than line posts. Without a deeper, reinforced footing to match, the post leans over time. Incorrect hinge placement or hardware mismatched to the gate's actual weight compounds the problem.
Fix: Re-plumb the gate post and reinforce the footing. Adjust hinge positions to redistribute load evenly. Confirm hinge hardware is rated for the actual gate weight — manufacturers publish ratings, but suppliers often underspecify them at point of purchase.
Pro Tips for Installing Permanent Fencing Effectively
Plan Accessory Integration Before Digging
Decide on gate hardware, windscreen attachment rails, top cap systems, and custom panel attachments during layout — not after posts are set. Retrofitting these details often means drilling into already-cured concrete footings, which weakens the installation.
For sports facilities and athletic complexes, coordinate with your windscreen or branding supplier before layout begins:
- Confirm post spacing accommodates your screen attachment system
- Verify top rail diameter and height match the windscreen's grommet pattern
- Align panel width with any planned branding graphics or logo placement
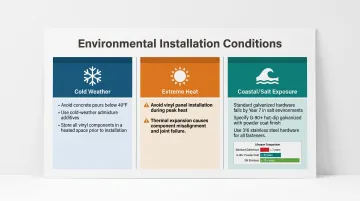
Account for Environmental Conditions
- Cold weather: Avoid setting concrete below 40°F without a cold-weather admixture
- Heat: Don't install vinyl panels in extreme heat — thermal expansion causes misalignment
- Coastal/salt exposure: Standard galvanized wire lasts 15–20 years inland but rusts within 3 years and fails by year 7 near the coast. Specify hot-dip galvanized G-90+ coating with architectural-grade powder coat, or use marine-grade 316 stainless hardware
Document Before Backfilling
Photograph post hole depths and footing pours before covering. Record post locations relative to property lines. Retain permit sign-off documentation.
This protects against future disputes, supports warranty claims, and gives you critical reference data if any section needs repair or extension down the road.
Conclusion
The quality of a permanent fence is almost entirely determined by decisions made before and during post installation. Get these four things right and the fence holds up for decades. Skip them and you're looking at expensive repairs within a few years:
- Correct depth — posts set to code for soil type and load
- Proper footings — concrete mix and cure time suited to the environment
- Confirmed alignment — string lines and level checks before concrete sets
- Material selection — galvanized, vinyl-coated, or powder-coated based on climate and use
Post-installation validation — checking plumb, tension, and gate swing before the crew leaves — is just as critical as the install itself. For projects on sloped terrain, high-wind sites, or commercial-scale runs, consult specialists early. The same applies to integrated systems like athletic netting and facility windscreens, where load distribution and attachment points require site-specific engineering to meet both structural and functional requirements.
Frequently Asked Questions
What is the average labor cost to install a fence?
Professional fence installation labor represents approximately 50% of total project cost, averaging around $1,600. Per-linear-foot costs range from $8 for chain-link to $55 for wrought iron. Costs vary by material type, terrain difficulty, and region. Gates add $150-$2,000 depending on size and automation.
Do I need a permit to put up a fence?
Most municipalities require a permit for permanent fencing. Permit requirements vary by jurisdiction and fence height — typical triggers are 6 feet for backyards and 3-4 feet for front yards. Check with your local building or zoning department before beginning installation. Typical permit fees range from $20-$60.
What is the 7 year fence law?
This refers to adverse possession or boundary fence laws, where a fence held in place for a statutory period can affect property line ownership. Statutory periods vary widely by state — from 3 years in Texas to 60 years for woodlands in New Jersey. Consult a property attorney for guidance specific to your situation.
How deep should fence posts be set for a permanent installation?
Posts should be set at least one-third of their total length below grade, with 4-6 inches of compacted gravel at the bottom. In cold climates, posts must reach below the local frost line (12-60+ inches) regardless of that rule — ASTM F567 requires a 24-inch minimum for 4-foot chain-link, plus 3 inches per additional foot of height.
How long does it take to install a permanent fence?
Professional crews complete 150-200 linear feet of residential fencing in 1-3 days of on-site work. Commercial installations range from a few days to several weeks depending on complexity. Factors extending timelines include rocky soil, permit delays, concrete cure time, sloped terrain, and utility relocation.
What is the most durable permanent fence material for outdoor facilities?
Top contenders by lifespan include galvanized chain-link (15-25 years), aluminum (30+ years), and wrought iron (50+ years with maintenance). Material selection should be driven by security requirements, aesthetics, and environmental exposure. Coastal installations require dual-layer protection — hot-dip galvanized plus powder coat, or marine-grade stainless steel.