Key Takeaways
- Create a panel diagram before installation day—measure every fence section individually and label panels accordingly
- Never install in windy conditions; wind makes the screen impossible to tension properly and creates safety hazards
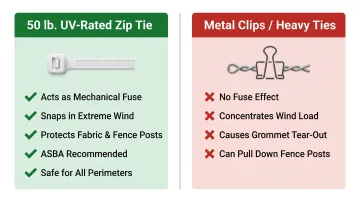
- Use 50 lb. UV-rated zip ties on every perimeter grommet — heavier ties or metal clips risk tearing the fabric
- Leave 6–12 inches of clearance at the bottom — this cuts wind load and keeps mowers from catching the screen
- Thread lacing cord through the center strip on 9-foot screens to prevent billowing
Tennis Court Windscreen Installation Guide
Installation follows a strict sequence: site measurement → material prep → positioning → tensioning → fastening → center lacing. Cutting corners at any stage creates compounding problems downstream.
A single-court job typically takes a two-person crew several hours when panels are pre-labeled and a diagram is ready. Multi-court installations require coordination and careful panel organization. Before any of that happens, the fence itself needs to pass inspection.
Prerequisites and Safety Considerations
Before touching a zip tie, inspect the fence structure. Check for bent posts, loose tension bars, or damaged chain link—hanging a screen on compromised infrastructure transfers wind load onto already-weakened points and can lead to fence collapse during storms.
Critical compatibility checks:
- Measure length from inside tension bar to inside tension bar, then subtract 4–6 inches per ASBA measurement standards—this creates proper gap spacing at panel ends
- Measure height from bottom of top rail to top of bottom rail
- Match labeled panels to your fence diagram before unrolling anything
Non-negotiables:
- Do not install on windy days—wind turns the screen into a sail and makes proper tensioning impossible
- Do not install screens that touch the ground
- Do not proceed if posts show visible lean or structural damage
Getting the correct fit and material before installation day eliminates the most common sizing and durability failures. The Windscreen Factory offers custom-sized panels with breathable, mildew-resistant materials matched to specific climates and fence configurations.
Tools and Materials Required
Essential items:
- 50 lb. UV-rated polypropylene zip ties (one per grommet for full perimeter)
- Lacing cord for center grommet strip on 9-foot screens
- Tape measure
- Fence diagram with panel labels
- Ladder or step stool for top rail access
Use 50 lb. UV-rated zip ties for the perimeter—not metal S-hooks, hog rings, or 120 lb.+ ties. Plastic ties act as a mechanical fuse during extreme winds, snapping to release the screen before it pulls down fence posts or tears the fabric. This is the ASBA-recommended approach.
A few metal S-hooks can hold the screen against the top rail while you work—freeing your hands to attach zip ties—but swap them out before finishing.
Some manufacturers recommend 120 lb. ties for high-wind regions. The tradeoff is straightforward: 50 lb. ties prioritize the fuse principle (screen releases before the fence fails); 120 lb. ties prioritize retention. Both approaches agree on one thing—metal clips and hog rings should never be used as perimeter fasteners.
How to Install a Tennis Court Windscreen (Step-by-Step)
Working out of sequence produces wrinkles, uneven tension, and premature grommet failure. Follow these steps in order.
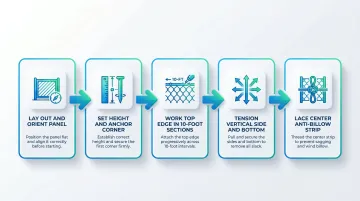
Step 1 – Lay out and orient the panel
Stretch the screen along the fence base on the court side to confirm fit. Identify the correct orientation: smooth, finished side faces into the court; hemmed side faces the fence. If air vents are present, position them at the top.
Step 2 – Set height and anchor the starting corner
Position the screen at correct height:
- 9-foot screen on 10-foot fence: typically 1 foot off the ground
- 6-foot screen: centered with up to 2 feet of open fence at bottom
- Standard bottom clearance: 6–12 inches above ground to reduce wind load and protect from mowers
Secure one top corner grommet to the fence mesh (not the top rail) with a zip tie.
Step 3 – Work the top edge in 10-foot sections
Attach zip ties to every top grommet across a 10-foot span, following the fence's chain link diamond pattern to keep the edge perfectly straight. Pull taut but not drum-tight—aim for flat and wrinkle-free, not stretched.
Step 4 – Tension the vertical side and bottom of each section
Once the top of a 10-foot section is secured, attach the vertical side edge grommets with downward tension. Then secure the bottom grommets, working from the center outward to push any remaining slack toward the sides. Complete this top → side → bottom sequence for each 10-foot section before moving to the next.
Step 5 – Lace the center anti-billow strip (9-foot screens only)
After the full perimeter is fastened, thread lacing cord through every grommet in the center horizontal strip. Knot at the center and lace outward toward both ends. This prevents billowing in moderate winds and dramatically reduces stress on top perimeter grommets.
Post-Installation Checks and Validation
A correctly installed screen should lie flat against the fence with no ripples, puckers, or sagging spans. Every grommet should have a fastener. The bottom edge should maintain consistent 6–12 inch ground clearance.
Perform these checks before leaving the site:
- Walk the full perimeter and confirm no grommets are skipped
- Tug each panel at center to confirm anti-billow lacing holds
- Confirm the smooth face is oriented toward the court on every panel
- Check that bottom clearance is uniform
- Snip excess zip tie tails for a clean finish
Don't skip this walkthrough. According to a tennis windscreen buying guide by Big Signs, wind-load failures often go undetected until the first storm — by which point the damage is already done.
Common Installation Problems and How to Fix Them
Even a well-planned installation can run into trouble. Here are the three most common problems — and exactly how to correct them.
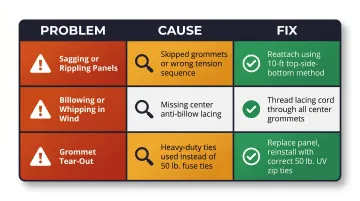
Sagging or Rippling Panels
Problem: Panels develop visible sag, waves, or puckers, especially mid-span.
Cause: Skipped grommets along the perimeter, or tension applied all from one end rather than in 10-foot sections using the top-side-bottom sequence.
Fix: Remove and reattach all zip ties on the affected section using the proper 10-foot method. Confirm every grommet has a fastener before re-tensioning.
Screen Billowing or Whipping in Wind
Problem: The screen inflates away from the fence and whips repeatedly, creating strain at top grommets.
Cause: The center anti-billow strip on a 9-foot screen was skipped or laced too loosely. This also occurs when a screen is installed on a fence taller than the screen with no center rail to anchor against.
Fix: Thread lacing cord through every center grommet and tie to the fence mesh at regular intervals. If no middle rail exists, create attachment points using zip ties looped around fence mesh at center-height diamonds.
Grommet Tear-Out and Panel Failure After Wind Events
Problem: One or more grommets tear through the fabric, often causing cascade failures along the panel edge.
Cause: Heavy-duty (120 lb.+) zip ties or rope was used on the perimeter rather than 50 lb. mechanical fuse ties. When ties don't break, wind load concentrates on adjacent grommets until the fabric tears. Skipped grommets compound the problem.
Fix: Replace torn panels and reinstall using 50 lb. UV-rated zip ties on the perimeter, one at every grommet. Inspect fence posts for damage if the fence bent during the wind event.
Pro Tips for Installing Tennis Court Windscreens Effectively
Before the first zip tie goes on, draw a panel diagram and measure each fence section individually — no two fences are identical. Numbering panels before unrolling and matching them to fence sections eliminates the most common on-site confusion.
Here are four practices that make the difference between a clean installation and one you're redoing mid-season:
Stick to manageable panel lengths. ASBA standards recommend no single panel exceed 60 linear feet. Longer panels are heavy, difficult to tension evenly, and prone to damage during removal.
Use snap hooks on one edge in wind-prone or cold climates. Installing the top or bottom edge with snap hooks (rather than standard zip ties) lets you roll and secure the screen without cutting all fasteners. In regions with winter snow and ice, full removal and dry storage is the best way to preserve screen lifespan.
Match your fastener spacing to your wind exposure. High-wind courts may need zip ties every 12 inches rather than the standard 18-24 inches. Consistent spacing also prevents uneven tension that causes premature wear along the grommets.
Bring in professional installers for complex jobs. Multi-court complexes, branded screens with custom graphics, and non-standard fence heights benefit from experienced crews who can maintain consistent tension across many panels simultaneously. The Windscreen Factory's installation team regularly handles these large-scale projects for sports complexes, schools, and HOAs — from fabrication through final inspection.
Conclusion
Installation quality directly determines how long your windscreen lasts, how well it protects the fence, and whether the warranty remains valid. Precision in measuring, proper hardware selection, and working the correct sequence aren't optional—they're the difference between a screen that performs for years and one that fails in the first season.
Preparation sets the outcome before a single zip tie goes on. Get the site diagram right, confirm material specs before ordering, and choose a calm-weather day to install. If you're sourcing screens for a school, park, or athletic facility and want fabric and hardware matched to your specific fence setup, The Windscreen Factory's team can help you spec the right product from the start.
Frequently Asked Questions
How long does it take to install a windscreen?
A single tennis court windscreen typically takes a two-person crew several hours when panels are pre-labeled and a diagram is ready. Multi-court jobs take proportionally longer. Skipping prep work is the most common reason installations run long and produce poor results.
Do windscreens work on tennis courts?
Yes. Windscreens are specifically designed for tennis court fences and serve multiple functions: reducing crosswind interference during play, providing a consistent visual backdrop for tracking ball flight, blocking debris, and adding privacy on public courts.
How long do tennis windscreens last?
Windscreens built with UV-resistant materials typically last 3–5 years or more, with warranties ranging from 2–7 years depending on material quality. Proper installation and seasonal maintenance are the primary factors that extend screen life. Poor installation can cut lifespan in half.
What material is used for tennis court windscreen?
The two primary types are knitted polyethylene mesh (for breathability and UV resistance) and vinyl-coated polyester (for higher opacity and durability). Breathable mesh is the most common choice because it reduces wind load on the fence while still delivering a clear visual backdrop.
What size mesh for tennis court fence?
The windscreen's wind-pass-through percentage is more relevant than mesh size. Note that opacity and breathability are inversely related — higher opacity means less airflow. Open mesh runs 55–70% opacity, closed mesh 80–90%, and solid vinyl 95–100%. Choosing the right opacity balances visual privacy with airflow to prevent excessive fence stress.
Should I remove my tennis windscreen during winter?
In climates with heavy snow, ice, or sustained high winds, removal and dry storage is strongly recommended to prevent screen and fence damage. At minimum, screens should be rolled and secured — skipping this step typically voids the manufacturer's warranty.